Each year Houston is the host to a huge technology conference for the Offshore industry.
This year the 2014 OTC Offshore Technology Convention will be held in the Reliant Center at One Reliant Park in Houston Texas. National Instruments will have a booth 3471 showcasing their latest products relevant to the offshore industry. I'm sure they will have their latest CompactRIO which has many installations in pumping and hydraulic fracturing operations for land-based operations. The proven reliability is perfect for offshore use.
Friday
Arduino and LabVIEW Bundle Bonanza
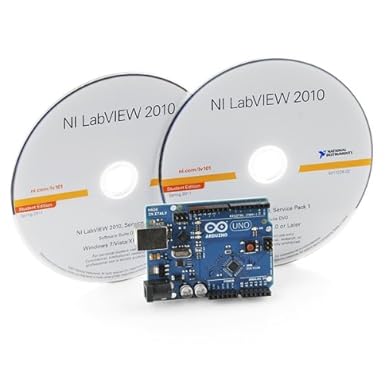 LabVIEW bundled with an Arduino. Such a great combination of a low cost and flexible electronic interface for sensors with LabVIEW the industry standard in measurement and test programming software. Anyone can purchase the Arduino microcontroller and be up and running LabVIEW within minutes. Web searches for the keywords "LabVIEW" have slowly dropped over the years since their peak at 2004. However the keyword "Arduino" has shot up like a rocket in the last two years.
LabVIEW can be free as long as you use the evaluation level given to anyone wanting to try the software out for free. National Instruments is very generous with this feature and allow students extra benefits. With the small investment in an Arduino Uno, you can have a full instrument measurement package to innovate with.
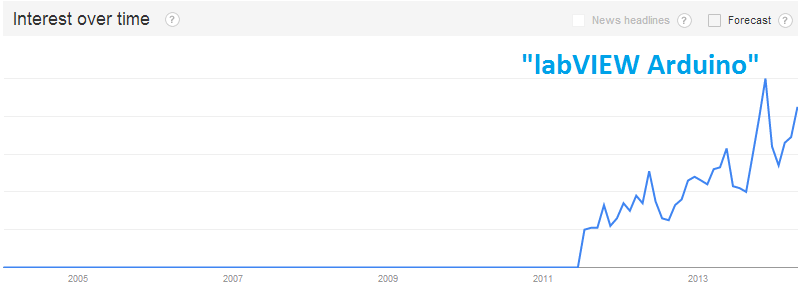
 The search keywords "LabVIEW Arduino" had a huge breakout in early 2011 when the LIFA patch was introduced. It's been on a steady rise ever since. Popularity is growing each year.
Thursday
Start NI TestStand training
Here is a list of all the basic NI TestStand documents I can find online. I attended this TestStand 3hr. course a few times. It's only useful if you do all the exercises in the book, then try making your own.
- Hands-On Automated Test Software.pdf
- Automated Test Software Hands-on With NI TestStand and LabVIEW -Presentation.pptx
- TestStand Overview YouTube Video
- Getting Started with TestStand
Saturday
TestStand and LabVIEW basics video
Here is my latest video. It's an overview of National Instruments TestStand test automation software used with LabVIEW to create a PCB testing system.
This video shows how easy TestStand and LabVIEW can be used to create a powerful test automation platform.
I couldn't find a lot of information on how to start using NI TestStand and LabVIEW together to create a PCB test sequence program.
I knew it was easy to do but I didn't realize it was this easy to get started. After one afternoon playing I was able to do this video.
My next video will be a little more advanced.
Wednesday
NIWEEK 2013
I attended my first day of NIWEEK.

It was lot's of fun. I registered my attendance first thing in the morning and the lady accidently gave me a Certified Developer tag for my badge. So I was a CLD for only a day. It was my lucky day. Hopefully it's a sign of the future. Maybe I will truly be a CLD soon.
I attended a LabVIEW seminar on file management in the morning after the keynote speeches.
I skipped lunch and walked around the Exhibit Hall to see all the neat things people have created using LabVIEW and NI products.
I attended a LabVIEW seminar on file management in the morning after the keynote speeches.
I skipped lunch and walked around the Exhibit Hall to see all the neat things people have created using LabVIEW and NI products.
 In the afternoon I attended a hands-on LabVIEW training and then a TestStand training.
 Later in the afternoon, I returned back to the Exhibit Hall to continue learning how others have used LabVIEW to solve a problem or just sort their marbles by colors.

Sunday
Is the case structure "case sensitive?"
Here was one of those tricking CLAD questions that I've never come across until I was taking the test.
The question was like this example:
 If this vi was run, what would the output be?
At first glance it looks easy. With the selector terminal input being 'clad' and the case selector label being Clad, it should run the one button dialog box and print "This
is Clad". But look again. The string input to the case structure is
lowercase "clad". Yes the case structure IS CASE SENSITIVE.
When I hit run on this vi, it doesn't recognize the "clad" and runs the
default case instead.
Here is what it looks like when I correct the lower case string input.

By correcting the string input to "Clad", it now matches the wording and case of the case structure and runs the "Clad" case which gives the one button dialog box output of "This is Clad".
Yes, the case structure IS case sensitive. Try it before you take the CLAD test.
The question was like this example:
At first glance it looks easy. With the selector terminal input being 'clad' and the case selector label being Clad, it should run the one button dialog box and print "This
is Clad". But look again. The string input to the case structure is
lowercase "clad". Yes the case structure IS CASE SENSITIVE.
When I hit run on this vi, it doesn't recognize the "clad" and runs the
default case instead.
Here is what it looks like when I correct the lower case string input.

By correcting the string input to "Clad", it now matches the wording and case of the case structure and runs the "Clad" case which gives the one button dialog box output of "This is Clad".
Yes, the case structure IS case sensitive. Try it before you take the CLAD test.
Friday
CLAD certified today !!!
I just passed the CLAD LabVIEW certification exam. It was a bit tricky. I studied everything I could find.
In my opinion, the test consisted of half of the standard questions you find on the online practice exams. The other 50% I have never seen before except for in the Core 1,2, and 3 classroom exercises.
It was 40 multiple choice questions. I finished in less than 30 minutes and used the rest of the time to review my answers.
My advice to anyone taking this test is to study the practice exams, but also methodically go through all the exercises of the Core 1 through 3 classes. If I would have reviewed those examples in the classroom exercise book, it would have greatly improved my final score.
For those who have not taken Core 1 through 3, I'll try to give a few examples in the next few weeks.
Stay tuned.
Saturday
Count to Three
Just like a programmer starts off printing "HELLO WORLD" on the screen, in LabVIEW you can start off by learning to count to three. It's not easy or intuitive to find a way to count between two numbers. The key words are "Quotient & Remainder."
On the Block Diagram hit CTRL and then SPACEBAR at the same time to pull up the Quick Drop dialog box. Type in Quotient & Remainder. It should find it by just typing in Quo....
 Now add a While Loop around the Quotient & Remainder.

We will use the iteration (i) terminal from the while loop to show the current loop count. The iteration terminal starts with zero on the first sequence. We connect a wire from the iteration (i) terminal to the X input of the Quotient& Remainder.

We need to add an upper limit number to the Y input of the Quotient & Remainder. So Right-Click your mouse over the Y input and Create a Constant. We want this vi to count from 0 to 3. Put a 4 in the constant box. The output will count from 0 to 3 because the first count will be the zero and the fourth count will be the number 3.
Right-click on the upper right output connector of the Quotient & Remainder and create an Indicator. This numeric indicator will be shown on the Front Panel. This is where the numbers will be seen. If you want to use this number for another operation, just add a wire and connect to another vi, or a graph, etc.
You will need to add a Stop button to the front panel for this example and wire it to the Stop if True function of the While Loop at the lower right hand corner. Let's also slow it down a little so we can see the operation working. Add a Wait Until Next ms Multiple icon with 500 as a constant wait time.
 Hit run and watch the numeric indicator count from 0 to 3 on the Front Panel. Hit the Stop button to end the process.
Thanks for learning how to Count To Three using LabVIEW with me. Feel free to leave a comment.


We will use the iteration (i) terminal from the while loop to show the current loop count. The iteration terminal starts with zero on the first sequence. We connect a wire from the iteration (i) terminal to the X input of the Quotient& Remainder.
We need to add an upper limit number to the Y input of the Quotient & Remainder. So Right-Click your mouse over the Y input and Create a Constant. We want this vi to count from 0 to 3. Put a 4 in the constant box. The output will count from 0 to 3 because the first count will be the zero and the fourth count will be the number 3.
Right-click on the upper right output connector of the Quotient & Remainder and create an Indicator. This numeric indicator will be shown on the Front Panel. This is where the numbers will be seen. If you want to use this number for another operation, just add a wire and connect to another vi, or a graph, etc.
You will need to add a Stop button to the front panel for this example and wire it to the Stop if True function of the While Loop at the lower right hand corner. Let's also slow it down a little so we can see the operation working. Add a Wait Until Next ms Multiple icon with 500 as a constant wait time.
Thanks for learning how to Count To Three using LabVIEW with me. Feel free to leave a comment.
Wednesday
LabVIEW & Arduino
Labview By Fairweather, Ian (EDT)/ Brumfield, Anne (EDT) (Google Affiliate Ad)
Arduino or compatible device
Install the NI-VISA drivers.
Install JKI VI Package Manager (VIPM) Community Edition (Free).
Install the LabVIEW Interface for Arduino as described here.
Connect your Arduino to your PC as described
in here.
Load the LabVIEW Interface for Arduino Firmware onto your Arduino as described in here.
Once you have everything loaded into the Arduino, attach an LED to pin 9 and build a VI in LabVIEW that will turn on the LED with a switch from the Front Panel of LabVIEW.
Install the LabVIEW Interface for Arduino as described here.
Once you have everything loaded into the Arduino, attach an LED to pin 9 and build a VI in LabVIEW that will turn on the LED with a switch from the Front Panel of LabVIEW.

Sunday
Website scraping with LabVIEW
Scrape or retrieve data from a website using LabVIEW. This is also called data harvesting or data extraction from websites.
One difficulty is finding good HTML data to scrape. Most data like stock quotes have been replaced with dynamic data that doesn't have a clear and consistent text strings that can be searched.
 Here is an example that opens a URL website, reads the HTML, picks out a string keyword and displays the data after that keyword.
I've chosen a weather site that has a consistent keyword like "temp"> and the page is dedicated to only one city. So the number after "temp"> will be that city's temperature.
Here is an example that opens a URL website, reads the HTML, picks out a string keyword and displays the data after that keyword.
I've chosen a weather site that has a consistent keyword like "temp"> and the page is dedicated to only one city. So the number after "temp"> will be that city's temperature.
 This vi will be great for any instrument attached to a network with a web-page to access.
Use the data socket open and then read to capture all the raw text of the webpage. Then use a string match pattern to search through the text to find the matching strings before the data that you want to scrape. The example show searches through the text of the webpage to find "temp">.
One difficulty is finding good HTML data to scrape. Most data like stock quotes have been replaced with dynamic data that doesn't have a clear and consistent text strings that can be searched.


Use the data socket open and then read to capture all the raw text of the webpage. Then use a string match pattern to search through the text to find the matching strings before the data that you want to scrape. The example show searches through the text of the webpage to find "temp">.
Monday
STEP #4 "HELLO WORLD" using LabVIEW
So you've completed STEP #1 Get LabVIEW and you've worked through the examples given in the tutorials.
Then you followed STEP #2 Get an Arduino.
You checked out your Arduino and now you are ready to program the LIFA files onto the Arduino with STEP #3 Load LIFA.
You need a way to test that everything is connected and working.
You also need to get familiar with both LabVIEW and Arduino together.
Your first LabVIEW project needs to be something very simple and easy to understand.
Most programming languages and starter circuits always have a "HELLO WORLD" to learn from.
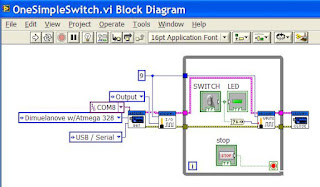
Controlling an LED with an on-screen switch would be an easy way you can interface the on-screen controls of the LabVIEW Front Panel with the real-world LED connected to an output of the Arduino.

You can start by adding a switch, a stop button and an indicator LED to your first front panel. You can also add these items from the Block Diagram.
Then you followed STEP #2 Get an Arduino.
You checked out your Arduino and now you are ready to program the LIFA files onto the Arduino with STEP #3 Load LIFA.
You need a way to test that everything is connected and working.
You also need to get familiar with both LabVIEW and Arduino together.
Your first LabVIEW project needs to be something very simple and easy to understand.
Most programming languages and starter circuits always have a "HELLO WORLD" to learn from.
Controlling an LED with an on-screen switch would be an easy way you can interface the on-screen controls of the LabVIEW Front Panel with the real-world LED connected to an output of the Arduino.

You can start by adding a switch, a stop button and an indicator LED to your first front panel. You can also add these items from the Block Diagram.
The Block Diagram shows the connection details of my Arduino Clone. Your settings may very depending on what Arduino device you have connected. You can always find the com port in your control panel, Hardware manager of Windows. Plug your Arduino into the USB jack and see what com port is listed when it connects.

STEP #2 Get an Arduino, or equivalent
The first equipment you will need is an Arduino UNO or compatible device. Here are photos of my Arduino which is smaller than the normal Arduino UNO. This is a clone Arduino. Arduino's come in many different packages, shapes and sizes. Choose which bests works for your situation.
I bought the small board on the left from http://www.adafruit.com/ and the red board connected is the USB to
Arduino board I bought from http://www.sparkfun.com/products/9716
The board on the right is just a block of LED's and a pushbutton connected to the Arduino as outputs and inputs.
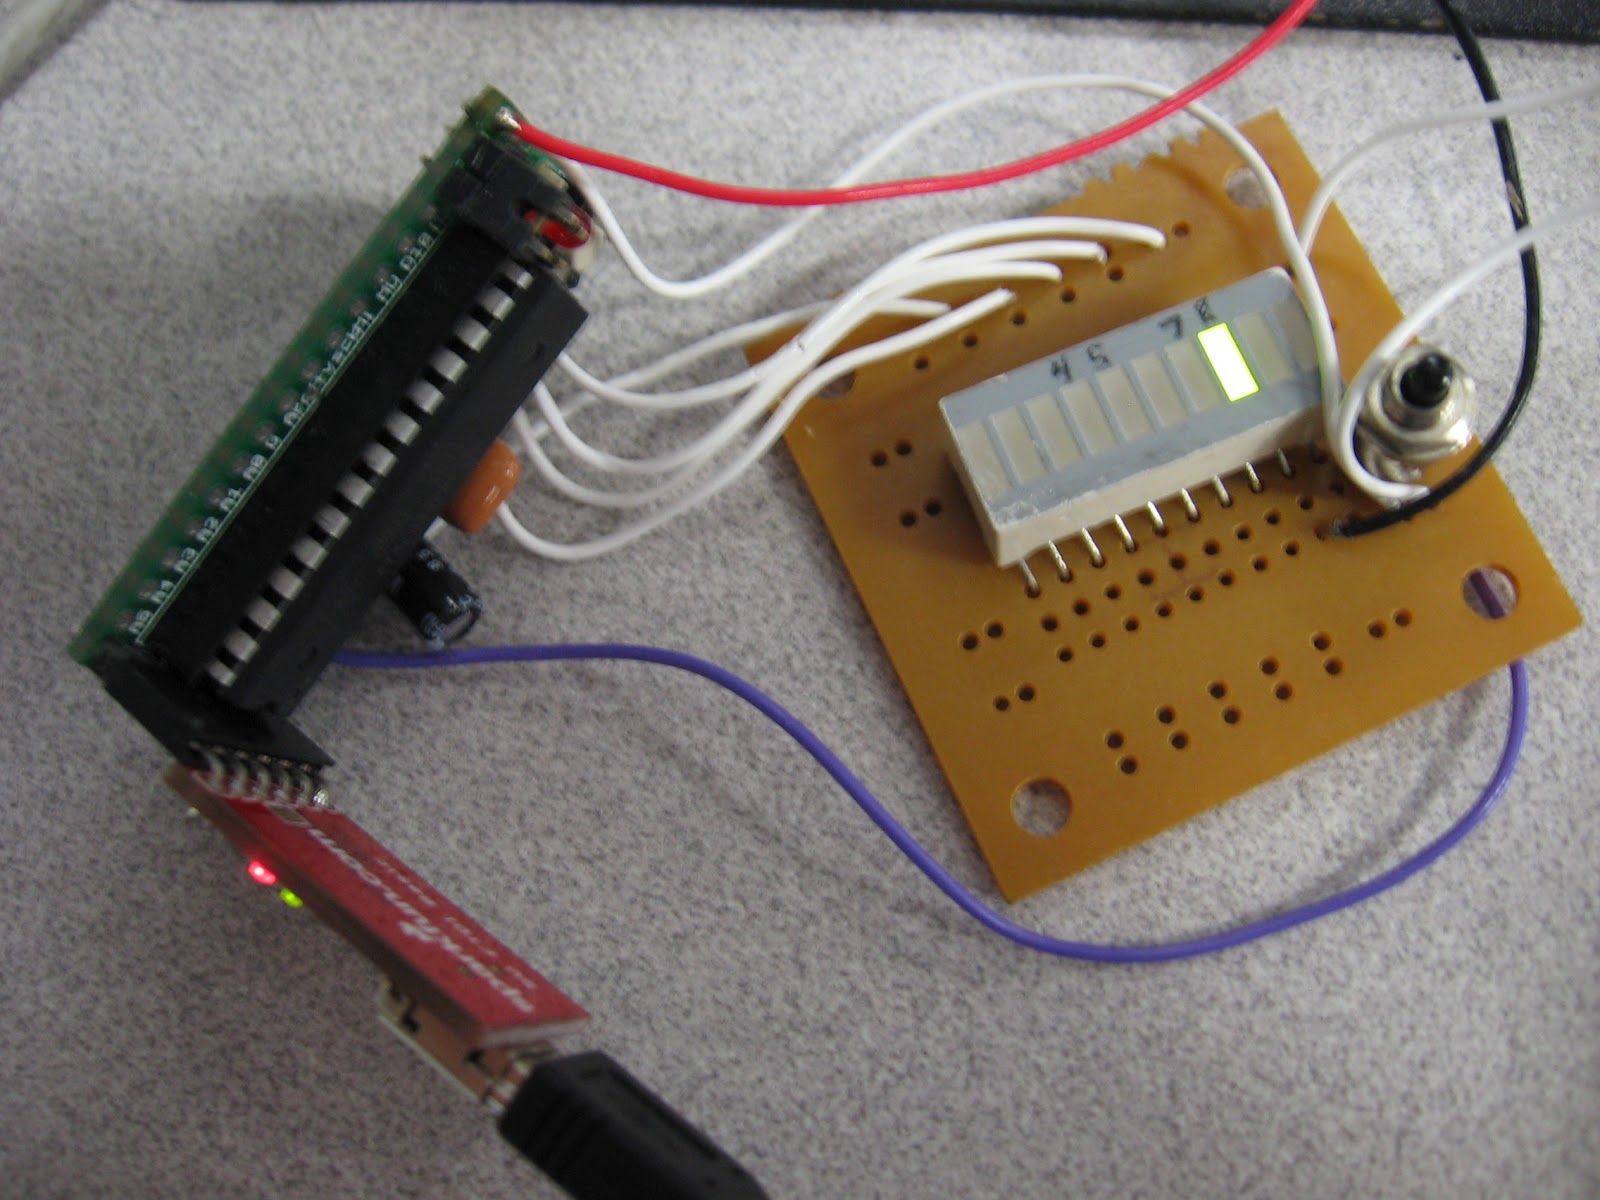
I used the USB board and connected it to a proto-board with a 10uf and 16MHz ceramic resonator which creates an Arduino compatable device.

 |
| UNO R3 |
All of these devices can be used to interface with LabView.
STEP #3 LabVIEW Interface for Arduino Setup Procedure
Setting up the LabVIEW Interface for Arduino (LIFA) is a six step process that you will only need to complete once you get LabVIEW setup on your computer and you have an Arduino or compatible device. Please follow the instructions below to start creating applications with the LabVIEW Interface for Arduino. LabVIEW Interface for Arduino Setup Procedure
Nice overview of using Labview-and-Arduino
Nice overview of using Labview-and-Arduino
Wednesday
INTRODUCTION TO THE PROJECT
My goal for this project is to fully utilize the free LabVIEW Student version and a relatively in-expensive Arduino microcontroller to build a test/troubleshooting box.
My first project is a test box for a simple multiplexer circuit. The circuit inputs are a clock signal and three switch inputs. The output is several LED's.
I want LabVIEW to control the clock input. I want to be able to turn the clock on and off, and also step through a clock sequence with a touch of a button.
I want LabVIEW to control the three switch controls from on-screen.
And the LED's should also be displayed on-screen and no physical LED's needed.
Hepefully all can be done with only the Student version of LabVIEW and the Arduino microcontroller.
If this simple task works, it will justify the cost of the full version of LabVIEW.
Subscribe to:
Posts (Atom)