Translate

Showing posts with label Arduino. Show all posts

Wednesday

LabVIEW & Arduino

Labview By Fairweather, Ian (EDT)/ Brumfield, Anne (EDT) (Google Affiliate Ad)
Arduino or compatible device

Install the NI-VISA drivers.

Install JKI VI Package Manager (VIPM) Community Edition (Free).
Install the LabVIEW Interface for Arduino as described here.

Connect your Arduino to your PC as described in here.

Load the LabVIEW Interface for Arduino Firmware onto your Arduino as described in here.
   
Once you have everything loaded into the Arduino, attach an LED to pin 9 and build a VI in LabVIEW that will turn on the LED with a switch from the Front Panel of LabVIEW.


Download this vi here:  BasicArduino3.vi


See my new site:  www.labviewtest.com/

Monday

STEP #4 "HELLO WORLD" using LabVIEW

So you've completed STEP #1 Get LabVIEW and you've worked through the examples given in the tutorials. 
Then you followed STEP #2 Get an Arduino
You checked out your Arduino and now you are ready to program the LIFA files onto the Arduino with STEP #3 Load LIFA.

You need a way to test that everything is connected and working. 
You also need to get familiar with both LabVIEW and Arduino together.

Your first LabVIEW project needs to be something very simple and easy to understand. 
Most programming languages and starter circuits always have a "HELLO WORLD" to learn from.

Controlling an LED with an on-screen switch would be an easy way you can interface the on-screen controls of the LabVIEW Front Panel with the real-world LED connected to an output of the Arduino.

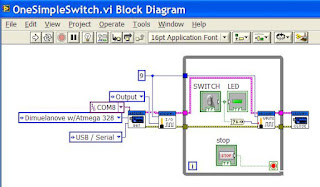
You can start by adding a switch, a stop button and an indicator LED to your first front panel.  You can also add these items from the Block Diagram.
The Block Diagram shows the connection details of my Arduino Clone.  Your settings may very depending on what Arduino device you have connected.  You can always find the com port in your control panel, Hardware manager of Windows.  Plug your Arduino into the USB jack and see what com port is listed when it connects.


STEP #2 Get an Arduino, or equivalent

The first equipment you will need is an Arduino UNO or compatible device.  Here are photos of my Arduino which is smaller than the normal Arduino UNO.  This is a clone Arduino.  Arduino's come in many different packages, shapes and sizes.  Choose which bests works for your situation.

I bought the small board on the left from http://www.adafruit.com/ and the red board connected is the USB to

Arduino board I bought from http://www.sparkfun.com/products/9716
The board on the right is just a block of LED's and a pushbutton connected to the Arduino as outputs and inputs.


I used the USB board and connected it to a proto-board with a 10uf and 16MHz ceramic resonator which creates an Arduino compatable device.


 And here is the original Arduino UNO R3 which has the USB circuit already installed.

UNO R3


All of these devices can be used to interface with LabView.

STEP #3 LabVIEW Interface for Arduino Setup Procedure

Setting up the LabVIEW Interface for Arduino (LIFA) is a six step process that you will only need to complete once you get LabVIEW setup on your computer and you have an Arduino or compatible device.  Please follow the instructions below to start creating applications with the LabVIEW Interface for Arduino. LabVIEW Interface for Arduino Setup Procedure

Nice overview of using Labview-and-Arduino

Tuesday

Top 5 Reasons LabVIEW Makes You More Productive When Using Arduino

Top 5 Reasons LabVIEW Makes You More Productive When Using Arduino

The Arduino microcontroller is a low-cost electronics prototyping platform. With the LabVIEW Interface for Arduino Toolkit you can leverage the power of the LabVIEW Graphical Programming environment to interface with the Arduino in a whole new dimension. Learn how the LabVIEW features listed below will help you increase productivity when using Arduino.

Arduino with LabView

LabVIEW is a National Instruments software package that provides a graphical programming language for interfacing the Arduino micorcontroller.

Check out the NI website for more information:  Use Arduino I/O With LabVIEW

The Arduino is an easy to configure, low-cost microcontroller with many built-in functions like:
  • Digital and analog inputs and outputs, PWM pulse width modulations, I2C communications, and SPI serial communications.
  • Loop rates: USB tethered (200 Hz) and wireless (25 Hz)
  • Open Arduino sketch and toolkit VIs help you customize functionality
The FIFA I/O engine sketch is loaded on Arduino to establish communications with LabVIEW